It’s not a secret that Amazon is one of the world’s largest online marketplaces. And while Amazon generates over $17 million per hour as one of the most successful companies in the world, an increasing number of people feel that it is also one of the best places to start and manage their own business. Indeed, starting an Amazon business is quite easy, but there are some challenges you may face along the way. Navigating Seller Central could be one of these. That is why we created this step-by-step guide to Amazon Seller Central to show you exactly where to add products, how to promote them, and where to get sales reports. Amazon Central is the control panel that you will use to monitor and operate your business, so it’s critical to know how to use it properly.
What is Amazon Seller Central?
Amazon Seller Central is a web-based control panel that allows you to operate and monitor various aspects of your business. Sellers can use it to manage inventory, ads, orders, and reports issues. Seller Central is your personal cockpit from which you will fly your “Amazon business” plane. You can also participate in programs like Fulfillment by Amazon (FBA), Seller Fulfilled Prime, and Automate Pricing through Amazon Seller Central.
Who Should Create an Account on Amazon Seller Central?
Amazon Seller Central is an excellent tool used by brand owners, individuals, and retailers who want to sell their products directly to Amazon customers using the Amazon website.
Brand owners
Amazon offers numerous benefits to brand owners and white label businesses, which is why it is a good idea to open an Amazon Seller Central account if manufacture products under your own trademark. One of the most significant advantages is that you can use programs such as A+ Content and Amazon Stores to customize your listings with images, videos, and other media content to engage more customers. If you own a patent or trademark for your products, you should also utilize Amazon’s Brand Registry Program. This will allow you to gain access to more advanced tools, create a storefront for your brand, and more.
Retailers
If you want to start reselling products, Amazon is a great platform to try. You won’t have to spend time on creating product listings from scratch because Amazon has an entire catalogue containing millions of products that are currently listed on the platform or have been sold there in the past. This list will likely contain most products you may want to sell, but if they don’t have listings yet, Amazon makes it simple to create listings from scratch.
Individual sellers
Although it may seem like Amazon is only suitable for large businesses, it is also a great place for individual sellers to start new ventures. The best part is that with the Individual plan, you can start selling right away while paying just one dollar per month. And once your business starts growing and sales numbers increasing, you can upgrade to the Professional selling plan and take advantage of all the bonuses and features it provides.
How to Create a Seller Account on Amazon?
Setting up your Seller Central Account is the first step every person who wants to sell on Amazon has to go through. All you need is an international credit card and your bank account information, including your account and routing numbers, as well as your tax identification number. Now, let’s go through the steps of creating an Amazon seller account.
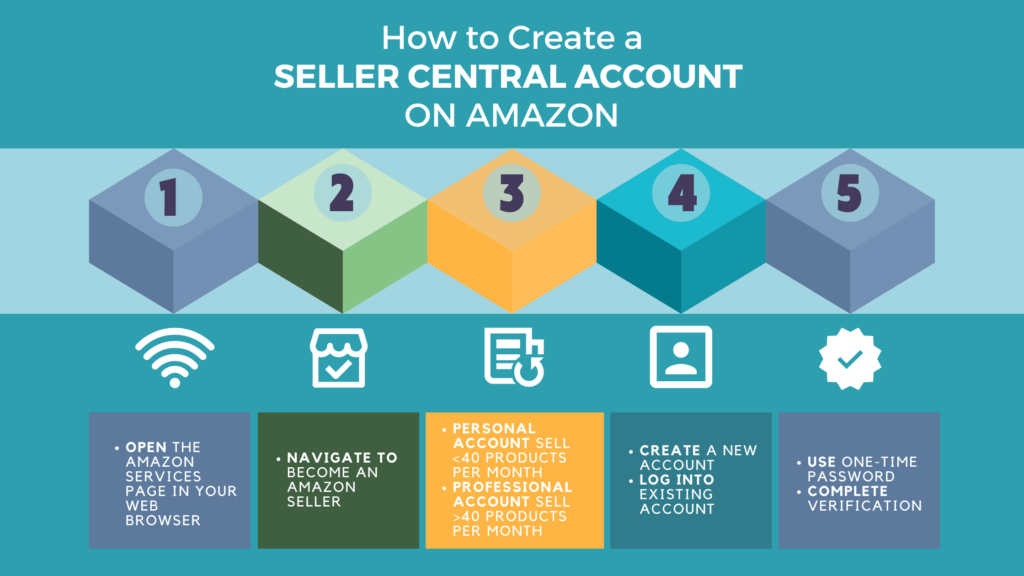
- First, go to Amazon: https://services.amazon.com
- Look for the “Become an Amazon Seller” section on the main page.
- Next, decide whether you want to use a personal or professional seller account. Individual seller plan is the best option if you expect to sell fewer than 40 items per month or are unsure of your sales strategy. Choose a Professional account if you expect to sell more than 40 items per month and want to save money.
- Click “Create a New Account,” then enter your email address and password to get started. If you’ve previously used Amazon and are an Amazon Prime member, all you have to do is log in to your account. Then, choose “Next” from the drop-down menu.
- You’ll be taken to a page that will ask you to enter the OTP (one-time password) that was mailed to your email address. Once you’ve completed the verification process, click the “Create your Amazon account” button.
Read our article on how to create an Amazon seller account for more information on how to set up an Amazon seller account and create a business strategy.
Amazon Seller Central: Getting Started
As soon as you sign up for an Amazon Seller Account, you will be taken to the main page, which contains numerous tabs. To help you delve deeper into the information you may require, each tab has its own drop-down menu. These are the tools you will need to manage your Amazon business.
The set-up of this dashboard is quite intuitive, as you will need to go from left to right to sell and evaluate your performance. Let’s go through each tab so you can familiarise yourself with all the options you have and features you can use:
- Catalog: You will use this section of the website to begin adding new items to your store or list products that are already available on Amazon. You can also save your work as a draft and go back and edit it later.
- Inventory: This is one of the most important tabs you will use on a regular basis. You can manage inventory and keep track of stock in this section. It doesn’t matter whether you sell through FBA or FBM, as you can still monitor all the numbers you need in this tab. You can also improve the quality of your listing here. ‘Manage Inventory’ is the most frequently used sections in the Inventory tab. You can adjust your pricing, view your sales rank, and assess your chances of winning the Buy Box on this page. This section also assists you in identifying issues with your current inventory, such as discovering suppressed listings. Problems with your listings will appear in the “status” column, where you can take the necessary action.
- Pricing: You will use this section to set and monitor the prices of your Amazon products. You can also set alerts and automate pricing increases and decreases in response to changes in your competitors’ pricing.
- Orders: This section is more useful for FBM sellers because it allows you to manage and fulfill orders, whereas Amazon takes care of these tasks for FBA sellers. You can also keep track of your products’ shipping journey. In addition, if you receive any returns, you can see them here.
- Advertising: In this section, you will create and configure Amazon PPC campaigns for your products. You will also have access to performance monitoring and ad optimization based on conversions and sales. You can also promote your products through coupons and Amazon lightning deals, and if you are a brand registered seller, you can use the Amazon Enhanced Brand Content tool to make your product listings more appealing to customers.
- Reports: There is nothing special about this section, as it simply contains a long list of reports that contain data and statistics about the health of your business, starting with payments and orders and ending with taxes. You can also try an interesting tool called Amazon Selling Coach, which will guide and assist you in improving your business strategy.
- Performance: This section contains messages and feedback from your customers, as well as chargeback claims. If you violate any of Amazon’s policies, you will be notified in the Performance Notification segment. You can also take advantage of Seller University here.
- Stores: Here you can create your own Amazon store page and customize it however you want.
- Growth: In this section, you will find a list of programs that can help you grow your business.
- App & Services: This is an Amazon app store that contains tools that can help you sell more effectively. It also comes with a number of professional programs to assist you.
Other Important Amazon Seller Central Sections
Aside from the main dashboard, you may notice a few interesting areas of the Seller Central that are also worth discussing.
Messages
After clicking this button, you will see a list of customer questions that you can answer. Remember that Amazon tracks your response time, and the lower it is, the better.
Help
This section contains a variety of articles that may be useful to you during the selling process. You can also find seller forums where you can discuss various topics and share your experience, as well as Amazon support, which you can contact at any time.
Settings
This section’s title speaks for itself. There are numerous options for returns, shipping, and FBA. You can also update, change, or add new business information to your account here.
Amazon Global Selling
There is a section called “Sell Globally” at the top left of the page that allows you to create another selling account and begin your global selling business.
After clicking, you will see a list of online marketplaces organized by region, as well as options for creating a new selling account. For some countries and regions, you will not need to do this and will instead have access to localized marketplaces through the same account. Amazon North America, for example, connects accounts in the United States, Canada, and Mexico.
Selling on Amazon Seller Central: A Beginner’s Guide
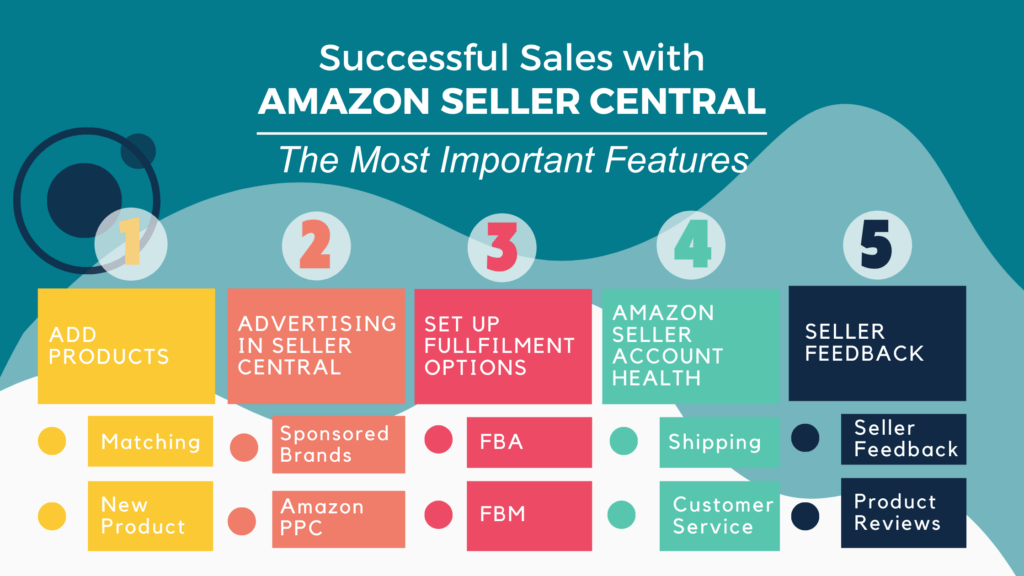
Adding Products to Amazon’s Catalog
Creating product listings isn’t difficult, but there are two ways to go about it. The first is to either add an existing Amazon listing offer or create a brand new one. To add a product, go to the “Inventory” tab and press the “Add a product” button. If the product has already been sold on Amazon, you will not need to do much:
Matching
This method of adding products is known as “Matching,” because you will only need to search the massive catalog of 350 million products to find your item. If you are a retailer or arbitrage seller, you are more likely to find all the products here. The search process is also straightforward; you can use the product title, GTIN (UPC,EAN, ISBN), or ASIN (Amazon’s unique product identifier) to get started. After you’ve found a match, add the product to your account and configure the price and quantity. Customers will then be able to view your listing.
Adding New Products
Select “I’m adding a product not sold on Amazon” if it is a one-of-a-kind item that has never been sold before. Obviously, this is a more intensive process because you must provide Amazon with all product details such as:
- UPC, EAN, JAN, or ISBN (products identifiers)
- Product details (name, brand, category, shipping options, and images)
- Product conditions (new or used)
- Products’ quantity and price
- Search Terms and Keywords
After you create your own listing, other Amazon sellers who start selling the same product will be able to use it. Remember that adding your own listing to a product that already exists on Amazon is against Amazon’s terms. Duplicates are either blocked or merged. You can still be a one-of-a-kind seller by joining the Brand Registry program; then other sellers will need authorization to create an offer for your product.
Advertising in Seller Central
You will most likely drive traffic to your product listings if you want to engage as many customers as possible. That is why you will frequently visit the Advertising console. Here you can create Sponsored Products ads, also known as Amazon pay-per-click campaigns. You’ve probably heard of Google PPC campaigns, which work based on specific keywords, and Amazon PPC is similar. When you bid on a set of keywords, your ad will appear alongside the search results for those keywords. The catch is that you will only be charged by Amazon if a customer clicks on your ad and is directed to your product page. You can choose your own keywords or use Amazon’s automated targeting system. The ads can also be customized in any way you want, and if everything is done correctly, you will definitely notice an improvement in your visibility and rankings. Keep in mind that running a successful PPC campaign entails constantly monitoring the results, improving what doesn’t work, and learning from your mistakes. If you are enrolled in Brand Registry, another good idea is to try Sponsored Brands ads. Simply go to “Advertising” and select “Campaign Manager” to create a new ad or monitor an existing one.
Setting Up Fulfillment Options
As you have probably heard, Amazon Sellers have two fulfilment options to choose from. These are Fulfillment by Merchant (FBM) and Fulfilled by Amazon (FBA). To discover more about FBA and FBM, read Amazon FBA vs FBM.
FBA
Fulfilment by Amazon is a selling method in which sellers send their products to Amazon fulfilment centres, which store, pack, and ship them to customers. Amazon also handles returns and offers customer service. Buyers can choose from a number of shipping options, including Amazon’s 1- and 2-day Prime shipping.
FBA Shipments Management
To manage your FBA shipments, go to the “Manage Inventory” section and select the product you want to ship. After you’ve found and chosen the product, select “Send/Replenish Inventory” from the dropdown menu. Another important section is “Manage FBA shipments” (located in “Inventory”), where you can see your storage and restock limits as well as manage the status of your FBA shipments.
FBM
To manage your FBA shipments, go to the “Manage Inventory” section and select the product you want to ship. After you’ve found and chosen the product, select “Send/Replenish Inventory” from the dropdown menu. Another important section is “Manage FBA shipments” (located in “Inventory”), where you can see your storage and restock limits as well as manage the status of your FBA shipments.
FBM Orders Management
After a customer orders your product, you must fulfil the order and mark it as shipped. Select “Manage Orders” from the “Orders” section. You can see a list of unfulfilled orders here and take the necessary actions.
Performance and Health of Amazon Seller Account
Another important factor to consider is Account Health, which can provide you with a comprehensive analysis of your business, beginning with Customer Service Performance and ending with Shipping Performance. If you receive negative seller feedback or have any policy violations that could affect your business, you will find it there. Be aware that if you do not take any further action and do not resolve the situation, your Amazon Seller Central account may be suspended. To view account health, navigate to the “Performance” section and select “Account Health.”
Seller Feedback and Product Reviews
It is critical to understand that while feedback from sellers and product reviews are both important for your reputation, they are not the same thing.
Seller Feedback
This is a five-star rating of your overall performance as a seller. Customers can leave a comment about your business practices within 90 days of purchasing a product, which will help other new buyers choose you as a reliable seller. Obviously, negative comments can also be made, tarnishing your entire reputation. If you strive to provide excellent customer service, you will almost certainly receive positive feedback.
Product Reviews
While seller feedback is about your business and how you communicate with customers, product reviews are solely about the product and its quality. Customers can also leave a 5-star rating and brief comments about how the product works, as well as which benefits and drawbacks it has. Good reviews boost conversions and your product’s search rank, putting you at the top of search results.
Can you request reviews and feedback?
Yes, you can do so by going to your Seller Central and clicking on the “Request a Review” button. After you click the button, Amazon will send the request to the customer’s email address, but keep in mind that you can only do this between 5 and 30 days after the parcel is delivered. Because the “Request a review” button is not automated, you must perform this action each time you ship the product to the customer. Obviously, there are numerous third-party apps and tools that allow you to automatically ask each customer for a review.
Final Thoughts
Amazon Seller Central is your gateway to the vast world of e-commerce business, which is brimming with opportunities. We’ve covered the most important topics, but there are many more things you’ll need to know to run a successful business. Selling on Amazon is a lot of work, especially if you don’t have any experience, which is why we recommend hiring a professional agency to assist you with the development of your Amazon business. Sign up for a free discovery call with one of Nuoptima’s Amazon experts, or leave your email address so we can contact you and tell you more about what we do.